Psionic Shield
Creates a temporary psionic energy barrier from which bullets and projectiles bounce back towards their point of origin.
Duration: 5 sec.
Cooldown: 15 sec.

C&C: Red Alert 3 - Uprising
Yuriko Omega, whose real name is Yuriko Matsuhi; the “Omega” is said to be the nickname given to her by the Empire’s Soldiers. Born in the coastal village of Tanabe, she was able to use her psychic powers from a very young age. The government got wind of her powers and very quickly placed her in the Shiro Psychic Research Centre under the supervision of Dr Shinji Shimada.
As part of the Omega Programme, she learnt to master most of her powers, such as the ‘Telekinetic Burst’, ‘Psychic Control’, the ‘Psionic Shield’ and the ‘Telekinetic Strike’. She attempted to escape from the Shiro centre, with Izumi’s help, but to no avail. She was subdued in time and was used by the Empire of the Rising Sun to fight the Allies and the Soviets, whilst her mood swings were controlled by means of a Psychic Regulator.
During the siege of Tokyo, she was found unconscious in the rubble of the Imperial Palace. She was immediately imprisoned. She was then transferred to the West and placed in total isolation in the high-security complex located in the jungles of Guam.
She managed to escape from the Dakota Detention Centre and returned to the Shiro Centre to put an end to Dr Shimada’s schemes and free Izumi. It turned out that at the Shiro Centre, they had been expecting Yuriko’s return. The laboratory had been completely refurbished, security had been significantly stepped up, and Psychic Inhibitors had been introduced. Every effort was being made to stop Yuriko.
However, her psychic abilities were growing and, as her powers developed, her speed, stamina and strength increased too. She managed to reach the top floor where Dr Shimada had taken refuge and rescued Izumi. But Izumi did not see things that way and engaged Yuriko in battle. After putting an end to Izumi’s actions, she destroyed the Shiro Centre and everything within it.
It is not known what became of her after the laboratory’s destruction. Did she return to fight the Allies and the Soviets alongside the Empire? Or did she simply vanish into thin air? Only time will tell…
Creates a temporary psionic energy barrier from which bullets and projectiles bounce back towards their point of origin.
Duration: 5 sec.
Cooldown: 15 sec.
Drastically reduces the time taken to travel from point A to point B. Also affects followers.
Passive optimisation
Speed: +25%
Creates a temporary psionic energy barrier from which bullets and projectiles bounce back towards their point of origin.
Duration: 7 sec.
Cooldown: 15 sec.
Drastically reduces the time taken to travel from point A to point B. Also affects followers.
Passive optimisation
Speed: +50%
Creates a temporary psionic energy barrier from which bullets and projectiles bounce back towards their point of origin.
Duration: 9 sec.
Cooldown: 15 sec.
Turns even the most bitter enemies into devoted fans, ready to serve and protect Yuriko to the death.
Domination: 3 infantry units
Range: short
Cooldown: 30 sec.
Heals the most serious injuries for ordinary people. This effect also applies to followers.
Passive optimisation
Maximum Health: +25%
Turns even the most bitter enemies into devoted fans, ready to serve and protect Yuriko to the death.
Domination: 5 infantry units
Range: medium
Cooldown: 30 sec.
Heals the most serious injuries that ordinary people would sustain. This effect also applies to followers.
Passive optimisation
Maximum Health: +50%
Turns even the most bitter enemies into devoted fans, ready to serve and protect Yuriko to the death.
Domination: 7 infantry units
Range: wide
Cooldown: 30 sec.
Allows you to lift people, objects and most vehicles, then hurl them to the ground with incredible force.
Range: short
Cooldown: 5 sec.
Increases Yuriko’s aggression, allowing her to easily eliminate whatever she pleases. Also affects her followers.
Passive boost
Attack power: +25%
Allows the user to lift several people, objects and most vehicles, and then hurl them to the ground with incredible force.
Range: medium
Cooldown: 4 sec.
Increases Yuriko’s aggression, allowing her to easily eliminate whatever she pleases. Also affects her followers.
Passive boost
Attack power: +50%
Allows the caster to lift numerous people, objects and most vehicles, and then hurl them to the ground with incredible force.
Range: wide
Cooldown: 3 sec.
Shiro Psychic Research Centre – “Final Exam”
Yuriko awakens after a long slumber deep within the Shiro Centre and attempts to escape.
This short mission allows you to discover and get to grips with Yuriko’s powers.
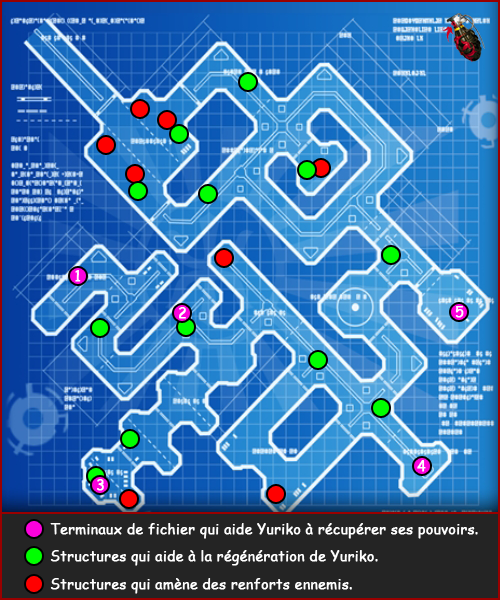
To do this, you must first retrieve files from terminals; the more you retrieve, the more power Yuriko gains. Once you’ve retrieved enough files, you’ll need to escape from Shiro’s asylum.
The Shiro Centre is a bit of a maze, but there’s probably only one route, and it’s very hard to get lost – though you can always check the mini-map whenever you like by pressing the ‘Esc’ key (You can also use the mini-map provided with the walkthrough).
On the way, you can retrieve the files from a fifth terminal and destroy other buildings. Be careful, though – you’ll also come across defensive nanodrones; destroy them before they finish building themselves.
Once you reach the final room, you’ll need to destroy the three King Oni before escaping through the main door.
1- “Total Domination”: Ever since I’ve mastered “Psychic Control”, everyone’s been nicer to me.
2- “Follow Me”: These are tests on my “Psionic Shield”. If he hadn’t been sure of his ability to deflect the shots, he wouldn’t have shot at me.
3- “Unhealthy Mind”: They taught me to move objects with my mind. Dozens of incidents have been blamed on my telekinesis.
4- “Recovery”: Every time I read the files on these terminals, I reclaim the powers that my captors took from me.
5- “Danger Ahead”: This is one of Shimada’s terminals. Nothing but racy photos and Mahjong games.